LServerAdmin - Add Linux Client
Add new Client - Linux
Note
Following instructions concern adding a new client PC. If client PC has 2 OSs installed and has already been added to LServerAdmin with Windows ssh access, we follow instructions in paragraph Add 2nd OS (Linux) to existing Client
After configuring ssh to Linux clients, we are ready to proceed adding them to LServerAdmin.
We do the following:
- We start LServerAdmin application as an administrator. [c16]
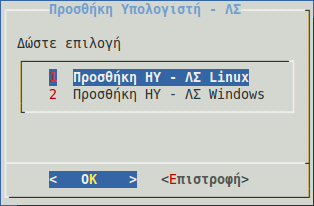
- We go to menu LAN / Edit PCs - Groups / Edit PCs / Add PC - OS / Add PC - Linux OS (image 1a)
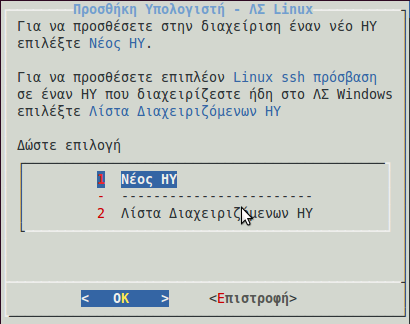
- We select New PC (image 1b) and then the group it belongs. If no group has been created yet, we can select No Group. We can always move the client to a group afterwards.
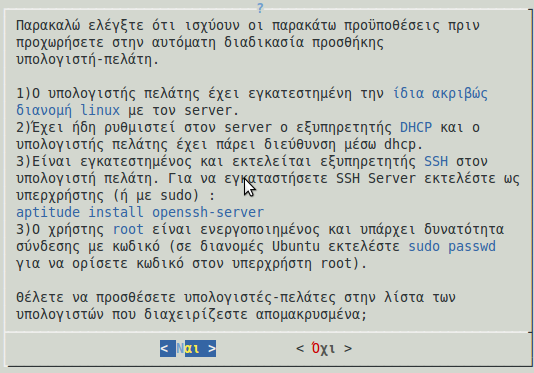
- Before proceeding, we make sure ssh is configured (image 1c - see Linux Client - Configure ssh server)
- We wait until required files are fetched.
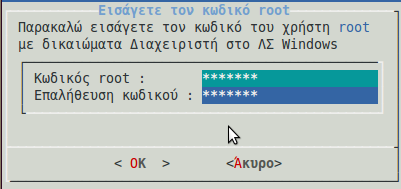
- We enter password for root user, that has administrative rights to Linux OS. (image 1d) We have specified a password to root user during installation (Debian) or after (see (Ubuntu Only) - Activate root account)
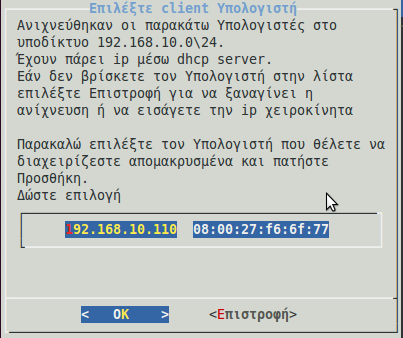
- Next we are shown a screen with client PCs that were detected on the local network. We choose the PC we want to add, based on the ip address, or network card mac address (image 1e).
Note
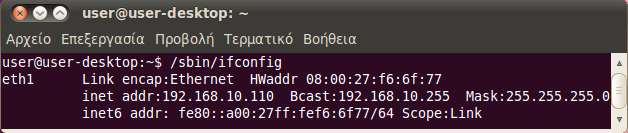
To check ip and mac address, we login to client, start a terminal and execute /sbin/ifconfig (image 1f).
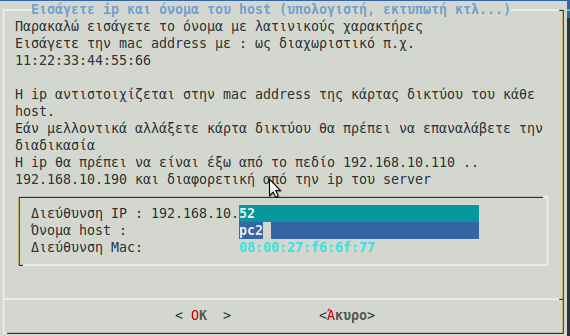
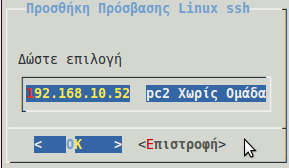
- We are asked to select a hostname and an ip address for the client PC (image 1g). We usually select consecutive ips (e.g. 192.168.10.51 for pc1, 192.168.10.52 for pc2 etc..).
- We have an option to upgrade distribution of client PC. (image 1h) To save time we can skip this procedure. We can always do it later, from LAN / All Client PCs/ Remote Execution - Linux / Upgrade Distribution.
- Client networking is restarted to get the new ip (e.g. from 192.168.10.110 to 192.168.10.51).
- Finally client PC is renamed to the hostname, we selected above and OS is restarted.
Adding new client PC is finished! We can now manage the client remotely to do various tasks (see Introduction).
We continue adding all client PCs one by one.
|
|
|
| image 1a | image 1b | image 1c |
|
|
|
| image 1d | image 1e | image 1f |
|

|
| image 1g | image 1h |
Add 2nd OS (Linux) to existing Client
Note
Following instructions concern adding access to a 2nd OS to an existing client PC, that we have already added Windows access to LServerAdmin. If we want to add a new client PC with Linux OS, we follow instructions in paragraph Add new Client - Linux
Suppose we have dual boot PCs running Windows and Linux, and we have already added the client PC to LServerAdmin from Windows OS. We now want to add a 2nd OS (Linux) to the existing client PC.
We should have already configured ssh on Client PC.
We do the following:
- We start LServerAdmin application as an administrator. [c16]
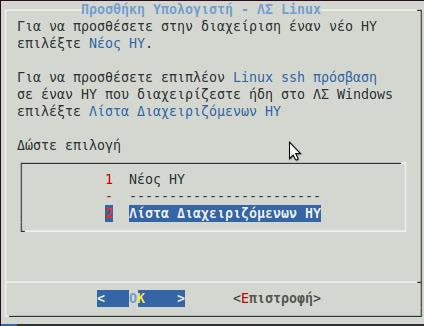
- We go to menu LAN / Edit PCs - Groups / Edit PCs / Add PC - OS / Add PC - Linux OS (image 2a)
- We select Existing Clients List (image 2a) and then the client we already have added in our administration. (image 2b)
From this point and on, we proceed with a similar way as in Add new Client - Linux.
The only difference is that we don’t have to supply a hostname and an ip, since we have already specified one when we added the client from Windows OS.
|
|
| image 2a | image 2b |